
![]() With the release of GP Power Tools Build 30 combined with the release of Visual Studio Integration Toolkit Build 18 and its Custom Forms Module, GP Power Tools gains the ability to create new windows.
With the release of GP Power Tools Build 30 combined with the release of Visual Studio Integration Toolkit Build 18 and its Custom Forms Module, GP Power Tools gains the ability to create new windows.
GP Power Tools – Developer Tools module is extremely powerful with its triggering and scripting capabilities using the Dexterity sanScript, SQL Server Transact-SQL, C# and VB.Net languages and over 100 helper functions, but has always lacked the ability to create new windows.
Until now …
GP Power Tools can use the system dialogs built into Dexterity such as warning, error, ask() and getstring(), and even create custom dialogs using the .Net Framework, but it has always lacked the ability to create completely new windows equivalent to Visual Basic for Applications (VBA) UserForms or Visual Studio Tools WinForms.
Note: VBA is discontinued and neither UserForms nor WinForms work on the Web Client. Custom Forms are Dexterity based and so are Web Client compatible.
Now, that limitation has been solved with the Custom Forms module in Visual Studio Integration Toolkit (VSIT) and the support added to GP Power Tools’ Runtime Execute window as a custom Script Purpose and access to the Custom Forms API calls via the Helper Functions window.
This sample shows how to create custom forms and make them work within your application using GP Power Tools. We will create a Setup form and a Maintenance Form with lines (which automatically comes with a lookup window, inquiry window and a report).
Note: There is now a new version of this project which uses GP Power Tools Custom Tables (added in Build 32) instead of the manual SQL Tables. It provides a simpler and faster implementation.
Below are the steps to create this example project:
Registering the Custom Forms
We start by creating a Project CUSTOM_FORMS using the Project Setup window. If you don’t have a specific window you want to use as the primary method of accessing the customization, use the VSTM_CustomFormSetup window in the Visual Studio Integration Toolkit (5986) product dictionary. From this window you can check your forms are registered and use the testing window.
We can then add two Runtime Execute Scripts with the custom Script Purposes for the Custom Forms module:
- CUSTOM_FORMS_01 with Script Purpose as 5986: EventRegisterForm
- CUSTOM_FORMS_02 with Script Purpose as 5986: EventHandlerForm
The template scripts are automatically added for you and can be modified as need. To register the forms, you need a call to DeveloperRegister of form VSTM_Forms to register your Developer ID and name, as well as at least one call to FormRegister of form VSTM_Forms or FormRegisterMaint of form VSTM_Forms to register the forms you need.
Note: Custom Forms API calls are always in the form of call with name “XXX of form VSTM_Forms” in dictionary 5986.

The Event Handler script has the case statements for different types of windows and has comments highlighting where code should be added for the CRUD (Create, Read, Update and Delete) table events. We will add this logic later.
To get the Custom Forms registered you can either log in again or click the Execute button on the script with the Script Purpose EventRegisterForm.
[Edit] The project has been updated to use the FormRegisterReserve and FormRegisterReserveMaint commands added in Visual Studio Tools Build 19 to allow the custom forms number 10 form to be used. This will then avoid the demo examples interfering with any low numbered custom forms on your system.
Displaying the Custom Forms
To display the forms, they need to be opened with Custom Forms API calls. As we already have VSIT installed we can use it to add application level menus for our new forms. We can create three triggers for the three menus we want added:
- CUSTOM_FORMS_01 Adding a menu to CL_Sales_Cards of form Command_Sales
- CUSTOM_FORMS_02 Adding a menu to CL_Sales_Inquiry of form Command_Sales
- CUSTOM_FORMS_03 Adding a menu to CL_Sales_Setup of form Command_Sales

The script for the trigger is a call to FormOpen of form VSTM_Forms added via the Helper Functions Button and selecting “Working with VSIT Custom Forms” and then selecting a Custom Form Function from the list.

This allows you to add the command to open a Custom Forms window.

Now we can start the project triggers and use the added menus to open the custom forms one at a time. Once each window is open you can use the Tools >> Customize >> Modify Current Window menu option to open the Modifier and add whatever extra fields are needed to the windows using Local Fields.

For changes made to the Maintenance window, add the same fields to Inquiry window but make sure to change them to Editable=false on the main window. No need to change the property in the scrolling window as the window itself is Editable=BrowseOnly.

From the Maintenance or Inquiry custom windows you can also print the report to the screen and click the Modify button to open Report Writer and add any extra fields needed as Calculated Fields using the placeholder RW Functions.
- KB 888884: Useful functions for developers to use instead of creating alternate reports in Microsoft Dynamics GP (Link updated)
For Header Table Fields, use Calculated Fields defined along the lines of:
FUNCTION_SCRIPT(rw_TableHeaderString 5986 (c) Combined Report VSTM_CF_MaintenanceHdr.CF_GenericID 0 1 )
For Line Table Fields, use Calculated Fields defined along the lines of:
FUNCTION_SCRIPT(rw_TableLineString 5986 (c) Combined Report VSTM_CF_MaintenanceHdr.CF_GenericID 0 (c) Sequence 0.00000 2 )
The final integer parameter in both examples above specifies which field to return from the table and will be used in the EventHandlerForm Script Purpose script later.
Once back in Microsoft Dynamics GP after modifying the windows and reports as needed, you can go back to window Project Setup window and use the Add >> Customization Maintenance option to add the modified resources to the project.
Note: Don’t forget to change security to use the Modified windows and reports. You can also use the Dynamic Product Selection window to change the window used while still in the development phase.
Storing Extra Fields
Setup windows and Maintenance windows in the Custom Forms module store the base data needed to make the windows work in the VSTM_CF_Setup (WVS00200), VSTM_CF_MaintenanceHdr (WVS00301) and VSTM_CF_MaintenanceLine (WVS00302) tables in the System Database. The keys include Company ID, CF_DeveloperID and CF_FormID to ensure the data is related to the specific form in the current company.
For this example, we will use SQL Tables to store the extra fields for the Maintenance (and Inquiry) window and the DUOS (Dynamic User Object Store) to store the extra fields for the Setup window. This is just to demonstrate both methods.
Notes: The SQL method becomes more efficient when there are more fields as the DUOS uses a separate table record for each field. The DUOS also only stores string datatype, so conversions are needed for other datatypes (there are Helper functions to do the conversions).
The DUOS (SY90000) table already exists, but we will need to create tables for storing extra fields in SQL. We can use a SQL Execute Script CUSTOM_FORMS_01 to create the table, set the permissions and bind defaults. This script will need to be executed once per company to add the tables.

To make it easy to read and write data from the newly created SQL tables, we are going to use Parameter Lists. Parameter Lists allow the field values to be automatically inserted into the SQL scripts without any risk of SQL Injection or having to manually manipulate the scripts.
The Parameter Lists are not going to be seen by the users but will make testing the SQL Scripts while developing easier. They need to include the key fields for the Header and Line tables and any extra fields.
- CUSTOM_FORMS_01 for Header Fields: ID and Extra Field(s)
- CUSTOM_FORMS_02 for Line Fields: ID, Sequence and Extra Field(s)

Hint: If you run out of parameters for the fields needed, you can use the From and To mode to get additional fields of the same datatype.
Now we need the SQL scripts for Saving, Reading and Deleting both Header and Line tables.
I have created these as the scripts below. I skipped number 2 on purpose so we can create matching scripts using Runtime Execute.
- CUSTOM_FORMS_03 for Save SQL Table for Header
- CUSTOM_FORMS_04 for Read SQL Table for Header
- CUSTOM_FORMS_05 for Delete SQL Table for Header
- CUSTOM_FORMS_06 for Save SQL Table for Line
- CUSTOM_FORMS_07 for Read SQL Table for Line
- CUSTOM_FORMS_08 for Delete SQL Table for Line
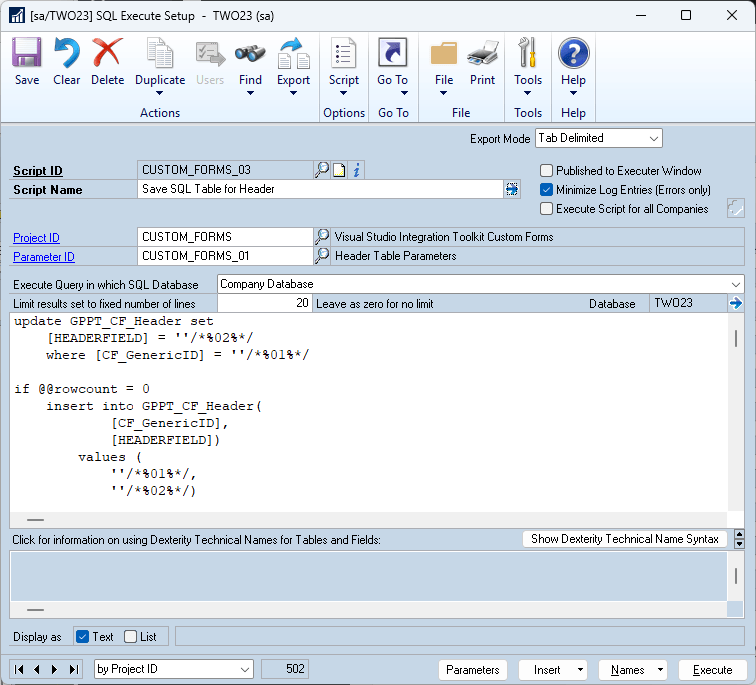
Note: The save script has two techniques for saving when you are unsure if you need to insert a new record or update an existing record. The second older method with an if exists() statement is commented out. The new method is a total of 1 or 2 SQL commands when the old method is 2 or 3 SQL commands.
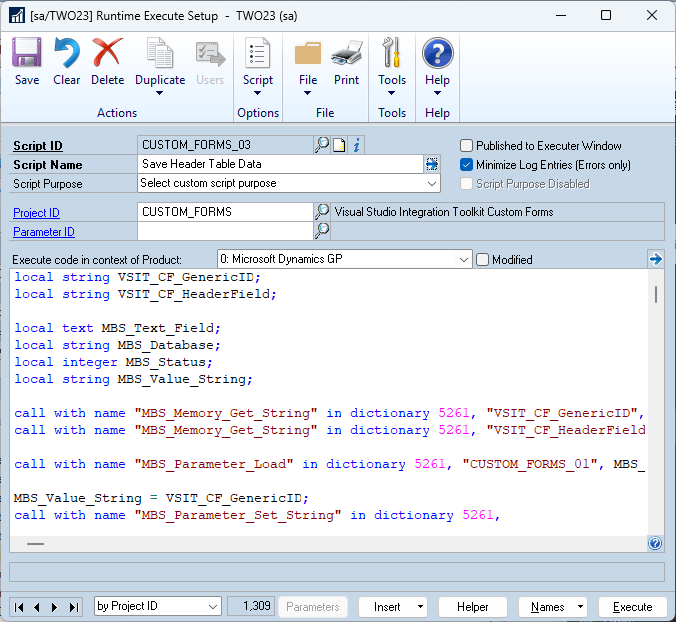
Creating a set of matching Runtime Execute Scripts allows us to re-use code to streamline the handling of Custom Form Events. It is not required but makes the event handler script smaller. The Runtime Execute scripts read memory parameters and then load the SQL script and populate the Parameter List values from the memory parameters and then execute the SQL script.
Working with Memory Parameters and then loading and executing a Runtime Execute script is less code than loading a Parameter List and setting its values and then loading and executing a SQL Execute script, so while this extra level adds more objects to the project it is easier to understand and maintain.
- CUSTOM_FORMS_03 for Save Header Table Data
- CUSTOM_FORMS_04 for Read Header Table Data
- CUSTOM_FORMS_05 for Delete Header Table Data
- CUSTOM_FORMS_06 for Save Line Table Data
- CUSTOM_FORMS_07 for Read Line Table Data
- CUSTOM_FORMS_08 for Delete Line Table Data
Note: The CUSTOM_FORMS_09 Runtime Execute Script is not required for the project but can be used to experiment with the various calls in the Custom Forms API.
That is all the preparation before the final step which puts everything together.
Pulling it all together
The CUSTOM_FORMS_02 Runtime Execute script, which is the code for the Script Purpose EventHandlerForm, is the glue that binds all the parts of the project together.
Setting this script work in the context of the Modified version of the Visual Studio Integration Toolkit dictionary allows it to access the modifier added extra fields.
All we need to do is add the calls to the DUOS Helper Functions to save the Setup table extra fields and the calls to the Runtime Execute Scripts we created for the Header and Line SQL tables.
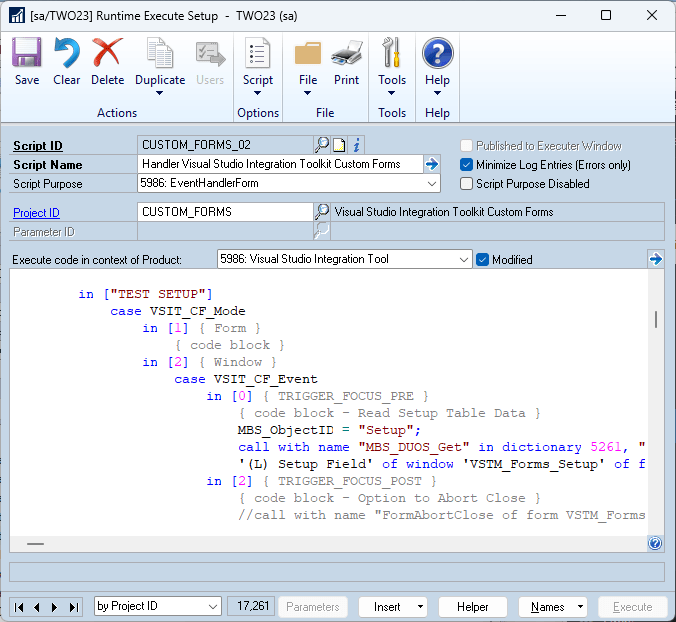
The Read table event scripts are reused for the Inquiry window and the RW functions.
Here is the Project Setup window showing all the objects that make up the project.

Downloading and Installing
BEFORE IMPORTING THE PACKAGE: Check if you will be overwriting an existing custom form’s modified windows. If necessary, do not import the package initially, run the Runtime Execute Script to register the custom form(s) and check the form number(s) using the System >> Cards >> Custom Form Setup window. Once you confirm the form(s) being used, you can edit the package with Notepad to change the form numbers. The number for each form is listed in two locations at the start of the definition for that form. If you do change form numbers, you can use the Project Setup window’s Options menu >> Find in Script window to locate references that need to be changed in the code. Code using the default form command (when possible) makes these change simpler.
Download the example code and import using the Project Setup window (now possible for first time imports with Build 28.8 onwards), or use Configuration Export/Import window (for older builds):
Note: After loading the project, to complete the forms registration you will need to either manually execute the CUSTOM_FORMS_01 Runtime Execute Script or login/switch companies again.
The code will be active on next login or after switching companies, or you can use start the triggers manually from the Project Setup window.
Note: Also make sure to change security to point to the modified window using Alternate Modified Forms and Reports IDs or temporarily with GPPT Dynamic Product Selection.
More Information
For more information see:
- #GPPT Implementing Custom Forms using GP Power Tools 2
- GP Power Tools Portal: https://winthropdc.com/GPPT
- GP Power Tools Samples: https://winthropdc.com/GPPT/Samples
- Visual Studio Integration Toolkit Portal: https://winthropdc.com/VSIT
- #VSIT Custom Forms Module added to Visual Studio Integration Toolkit Build 18
- #GPPT Creating Additional .Net Dialog Windows using Scripts
If you haven’t done so already, update to GP Power Tools Build 30 and later and Visual Studio Integration Toolkit Build 18 or later to be able to use the Custom Forms module.
Please install this sample project and have a look around and in conjunction with this article get an understanding of how you can use this amazing functionality in your projects.
David
04-Sep-2023: Updated project to no include definition of Blank Custom Form as it is not used in the project.
06-Sep-2023: Added information on checking and changing custom form details if necessary.
08-Oct-2025: Updated project to use new Form Registration commands to reserve form number 10. Also fixed link to KB Article 888884.
13-Oct-2025: Added links to new version of the project using Custom Tables instead of SQL Tables.
This article was originally posted on https://www.winthropdc.com/blog.
2 thoughts on “#GPPT Implementing Custom Forms using GP Power Tools”