
#GPPT Using Virtual Fields to Display Line Comments on Sales Transaction Entry

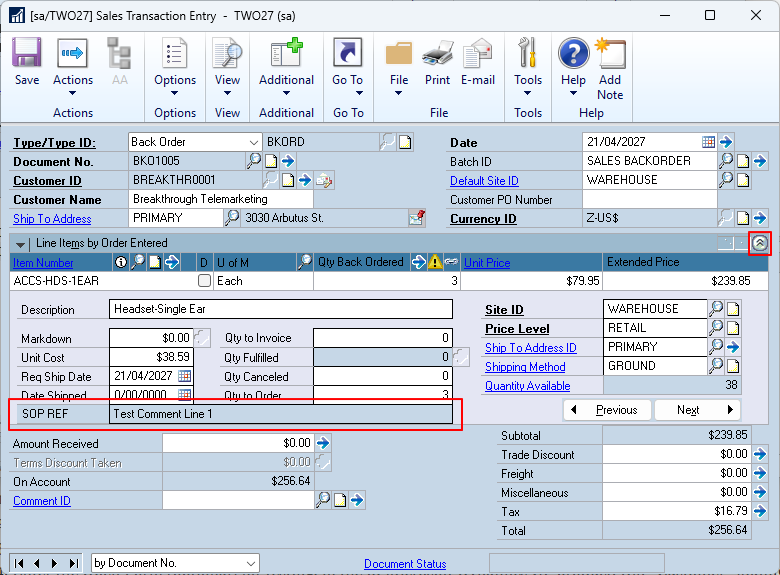
 This is another project that started because of a support case. The customer’s request was to display as “Read Only” the first line of the Line level Comments in the scrolling window (when expanded) on the Sales Transaction Entry window.
To avoid having to create a modified version of the window, it was decided to use GP Power Tools Developer Tools with the Virtual Fields functionality added in build 31.
Below are the steps to create the project and triggers needed.
Create The Project
Let’s start by creating the project:
- Open the Project Setup window. Click clear if an existing current project is displayed.
- Enter the Project ID: SOP LINE COMMENT
- Enter the Project Description: Display SOP line comment in Sales Transaction Entry
- Enter the Open Form (optional) for testing, in the 0: Microsoft Dynamics GP product, SOP_Entry
- Mark the project as your Current Project.
- Press Ctrl-S to save and continue (or Options Menu >> Save and continue).
Create the Virtual Field
The next step is to create a Virtual Field on the Scrolling window of the Sales Transaction Entry window. Virtual Fields must be created before the Form Pre event.
- From the Project, Click Add >> Trigger Setup.
- Enter the Trigger ID: SOP LINE COMMENT 01 and Trigger Description: Add Read Only Virtual Field on Form Pre.
- Check Start Trigger Automatically checkbox.
- Set Trigger Type: Focus Event, Trigger Event, Form Pre, Trigger Attach: Before Original.
- On the Resource Tab, select Product: 0: Microsoft Dynamics GP, Form Name: SOP_Entry.
- On the Script Tab, use the Help Functions window to insert the script template with Working with Virtual Fields >> Add a Virtual Field >> Field and Prompt. We can then edit the template to use the VF_Field_STR50_01 field provided in the GP Power Tools (5261) dictionary. Some “trial and error” was used to get the final location and widths for the field and the prompt.
- Click Save.
out boolean OUT_Condition;
local reference MBS_VF_FieldReference;
local reference MBS_VF_PromptReference;

OUT_Condition = false;

if isopen(form SOP_Entry) then
	call with name "MBS_Add_Virtual_FieldPrompt" in dictionary 5261,
							0 { Form Dictionary }, "SOP_Entry" { Form }, "Line_Scroll" { Window },
							5261 { Field Dictionary }, "VF_Field_STR50_01" { Field },
							133 { Top }, 100 { Left }, 20 { Height }, 344 { Width },
							1 { Vertical Resize (T,C,B,TG,G,BG) }, 1 { Horizontal Resize (L,C,R,LG,G,RG) },
							false {Editable }, true { Border }, false { Create Triggers }, "" { Default Value/Caption },
								MBS_VF_FieldReference { Field Reference },
								5261 { Prompt Dictionary }, "VF_Prompt_01" { Prompt Field },
								93 { Prompt Width }, "SOP REF" { Prompt Label },
								MBS_VF_PromptReference { Prompt Reference };

	OUT_Condition = true;
end if;
Populate the Virtual Field
To populate the Virtual field, we need to identify the line being displayed, read the table and display the data into the Virtual field.
- From the Project, Click Add >> Trigger Setup.
- Enter the Trigger ID: SOP LINE COMMENT 02 and Trigger Description: Populate Virtual Field on Scroll Fill.
- Check Start Trigger Automatically checkbox.
- Set Trigger Type: Focus Event, Trigger Event, Scroll Fill, Trigger Attach: After Original.
- On the Resource Tab, select Product: 0: Microsoft Dynamics GP, Form Name: SOP_Entry, Window Name: Line_Scroll, Table Name: SOP_LINE_WORK.
- On the Script Tab, add the code below. This script uses a Helper function to get the Line Item Sequence for the transaction line from the SOP_LINE_WORK table buffer and then uses that with the transaction key fields from the window to retrieve the transaction line’s comments (if they exist). It then uses Helper functions to get the references for the field and the prompt and set their values accordingly.
- Click Save.
out boolean OUT_Condition;
local reference l_field;
local integer l_status;
local integer l_seq_status;
local string l_value;
local string l_doc;
local string l_db;
local text l_sql;
local vcurrency l_seq;
local long l_line;
local long l_type;

OUT_Condition = false;

if isopen(form SOP_Entry) then
	clear l_value;

	call with name "MBS_Get_Table_Buffer_Value_Numeric" in dictionary 5261,
	    0, "SOP_Entry", "SOP_LINE_WORK", "Line Item Sequence",
	    l_seq, l_seq_status;

	if l_seq_status = OKAY then
	    l_line = long(l_seq);
	    l_type = 'SOP Type Database' of window SOP_Entry of form SOP_Entry;
	    l_doc = 'SOP Number' of window SOP_Entry of form SOP_Entry;

	    if not empty(l_doc) and l_line > 0 then

			clear table SOP_LINE_CMT_WORK_HIST;
			'SOP Number' of table SOP_LINE_CMT_WORK_HIST = l_doc;
			'SOP Type' of table SOP_LINE_CMT_WORK_HIST = l_type;
			'Component Sequence' of table SOP_LINE_CMT_WORK_HIST = 0;
			'Line Item Sequence' of table SOP_LINE_CMT_WORK_HIST = l_line;
			get table SOP_LINE_CMT_WORK_HIST;
			if err() = OKAY then
				l_value = 'Comment'[1] of table SOP_LINE_CMT_WORK_HIST;
			else
				clear l_value;
			end if;

	    end if;
	end if;

	call with name "MBS_Get_Field_Reference" in dictionary 5261,
	    0, "SOP_Entry", "Line_Scroll",
	    5261, "VF_Field_STR50_01", l_field;

	if not empty(l_field) then
	    call with name "MBS_Set_Virtual_Field" in dictionary 5261,
	        5261, l_field, l_value, false, l_status;
	end if;

	call with name "MBS_Get_Field_Reference" in dictionary 5261,
	    0, "SOP_Entry", "Line_Scroll",
	    5261, "VF_Prompt_01", l_field;

	if not empty(l_field) then
	    call with name "MBS_Set_Virtual_Field" in dictionary 5261,
	        5261, l_field, "SOP REF", false, l_status;
	end if;

	OUT_Condition = true;
end if;
Conclusion
Here is the end result showing the Virtual Field added to the scrolling window when expanded, with the first line of the line level comment displayed as read only.
Downloading and Installing
Download the example code, import using the Project Setup window (without any project showing, select the path to the xml file and click Import):
The triggers (if not disabled) will be active on next login or after switching companies, or you can start the triggers manually from the Project Setup window.
More Information
For more information see:
- #GPPT Using Virtual Fields to Display Line Comments on Sales Transaction Entry (This Article)
- #GPPT Using Virtual Fields to Display and Edit Line Comments on Sales Transaction Entry (Next Article)
- GP Power Tools Portal: http://winthropdc.com/GPPT
- GP Power Tools Samples: http://winthropdc.com/GPPT/Samples
- GP Power Tools Videos: http://winthropdc.com/GPPT/Videos
Hope you find this example useful.
David
This article was originally posted on https://www.winthropdc.com/blog.