
#GPPT Making Class ID on Customer Maintenance Required

 This is the eighth article in the series on making window fields required. If you have not yet read the introduction article to the series, please read that first:
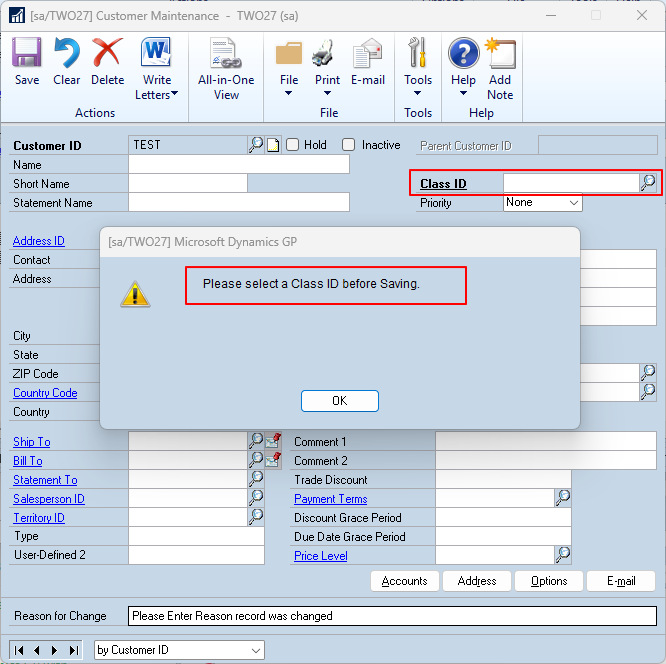
This example uses GP Power Tools to make the Class ID field on the Customer Maintenance window required and change the dialog to add a specific message.
This article comes after a support case that was raised with us which is explained more in the follow up article about the Vendor Maintenance window.
The Customer Maintenance window is using the required() function so making the Class ID field is as simple as changing the Required field property for the field to true. You can do this with GP Power Tools’ Form Control module or using Developer Tools with a single trigger on the Window Pre event using the Field_SetBooleanProperty() command to change the FIELD_PROP_REQUIRED to true. These methods are discussed in the previous article in the series:
The additional twist is that we also want to change the dialog displayed to have the wording “Please select a Class ID before Saving.” and then leave the cursor on the Class ID field.
Create The Project
Let’s start by creating the project:
- Open the Project Setup window. Click clear if an existing current project is displayed.
- Enter the Project ID: CUST_CLASS_ID
- Enter the Project Description: Make the Cusomer Class ID required with changed dialog wording
- Enter the Open Form (optional) for testing, in the 0: Microsoft Dynamics GP product, RM_Customer_Maintenance
- Mark the project as your Current Project.
- Press Ctrl-S to save and continue (or Options Menu >> Save and continue).
Make the Field Required
To make the field required on the window, use the following steps to create a trigger after the window pre event:
- From the Project, Click Add >> Trigger Setup.
- Enter the Trigger ID: CUST_CLASS_ID_01 and Trigger Description: Make the Customer Class ID Field required.
- Check Start Trigger Automatically checkbox.
- Set Trigger Type: Focus Event, Trigger Event, Window Pre, Trigger Attach: After Original.
- On the Resource Tab, select Product: 0: Microsoft Dynamics GP, Form Name: RM_Customer_Maintenance, Window Name: RM_Customer_Maintenance.
- On the Script Tab, add the Field_SetBooleanProperty() command as shown below to set the Required Property to True.
- Click Save.
out boolean OUT_Condition;

OUT_Condition = false;

if isopen(form RM_Customer_Maintenance) then
	Field_SetBooleanProperty('Customer Class' of window 'RM_Customer_Maintenance' of form 'RM_Customer_Maintenance', FIELD_PROP_REQUIRED, true);
	OUT_Condition = true;
end if;
Change the Dialog Message
We could finish there, but we also want to change the message displayed in the dialog and set the focus to the Class ID field. To make this happen we can add a second trigger before the ‘Save Record’ field script as this is the script used to save the customer to the RM_Customer_MSTR table. Use the following steps to create the second trigger:
- From the Project, Click Add >> Trigger Setup.
- Enter the Trigger ID: CUST_CLASS_ID_02 and Trigger Description: Change Warning Dialog to say the Customer Class ID is required.
- Check Start Trigger Automatically checkbox.
- Set Trigger Type: Focus Event, Trigger Event, Field Change, Trigger Attach: Before Original.
- On the Resource Tab, select Product: 0: Microsoft Dynamics GP, Form Name: RM_Customer_Maintenance, Window Name: RM_Customer_Maintenance, Field Name ‘Save Record’.
- On the Actions Tab, select Display Message to screen using system dialog, Display Message: Please select a Class ID before Saving., select Display Message to screen using simple dialog instead of text dialog, Dialog Type: Warning. Then select Issue Reject Script. This will display the desired warning and prevent the original code running when our script returns OUT_Condition as true.
- On the Script Tab, add a check for the required fields (manually as we don’t want to include the Class ID field) and then check if Class ID is empty. If the conditions are met we can set focus to the Class ID field and set the OUT_Condition to true.
- Click Save.
in string IN_OldValue;
in string IN_NewValue;
out boolean OUT_Condition;

OUT_Condition = false;

if isopen(form RM_Customer_Maintenance) then
	{ Can't use Required as Customer Class ID is now part of required() }
	//if required(window 'RM_Customer_Maintenance' of form 'RM_Customer_Maintenance') then
	if not empty('Customer Number' of window 'RM_Customer_Maintenance' of form 'RM_Customer_Maintenance')then
		if empty('Customer Class' of window RM_Customer_Maintenance of form RM_Customer_Maintenance) then
			focus 'Customer Class' of window RM_Customer_Maintenance of form RM_Customer_Maintenance;
			OUT_Condition = true;
		end if;
	end if;
end if;
Conclusion
This is all that is required to make the field required and change the message displayed when the Class ID field has not been entered.
Downloading and Installing
Download the example code, import using the Project Setup window (without any project showing, select the path to the xml file and click Import):
The triggers (if not disabled) will be active on next login or after switching companies, or you can start the triggers manually from the Project Setup window.
More Information
For more information see:
- #GPPT Making Window Fields Required and Why It Does Not Always Work
This article contains the links to the other sample projects in the series.
- GP Power Tools Portal: http://winthropdc.com/GPPT
- GP Power Tools Samples: http://winthropdc.com/GPPT/Samples
- GP Power Tools Videos: http://winthropdc.com/GPPT/Videos
Hope you find this example useful.
David
This article was originally posted on https://www.winthropdc.com/blog.