
#GPPT Form Control Introduction – Making Maintenance windows Read Only – Part 2

 Form Control provides a “No Code/Low Code” Customization tool for Microsoft Dynamics GP that can revolutionize how users, consultants and developers can make changes to how GP windows work. It was added as a new module to GP Power Tools with the release of Build 31.
This is the second article in a series of four articles. The series provides an introduction to Form Control, why it was created, how it works and what it is capable of doing. I will describe how the initial example of making Maintenance windows Read Only was configured. Then I will provide details of some extensions that can be added. The final article has downloadable sample projects for both Customer and Vendor Maintenance.
This article explains how to create a simple Form Control ID to make a maintenance window read only.
Using Form Control
Below are the steps to implement Form Control to make the Customer Maintenance window and Customer Address Maintenance window, along with their child windows, read only.
Best practice is to create a Project to group all resources together and allow simple exporting and importing of the resources. You can also use the Open Form hyperlink to open the window for testing. You can skip to the next section if you do not wish to create a project.
- Open the Project Setup window.
- Press clear if a current project opened automatically.
- Create a new Project. Project ID: FORM CONTROL CUSTOMER, Project Description: Form Control to make Customer Maintenance windows Read Only.
- Check the Current Project checkbox if you want to make this the current project.
- Optional: Select the Form to open when testing: Product Name: 0: Microsoft Dynamics GP, Open Form: RM_Customer_Maintenance.
- Check the Transfer User and Company details if you want the User Settings to be included when exporting.
- Press Ctrl-S to Save and Continue (or select Save and Continue from the Options menu).

Create the Form Control ID from the Project.
- Click Add >> Form Control Setup to open the Form Control Setup window.
- Create the Form Control header. Form Control ID: FORM CONTROL CUSTOMER, Form Control Name: Form Control to make Customer Maintenance windows Read Only.
- The Project ID will already be populated when the window was opened from Project Setup.
- Press Ctrl-S to Save and Continue (or select Save and Continue from the Options menu).
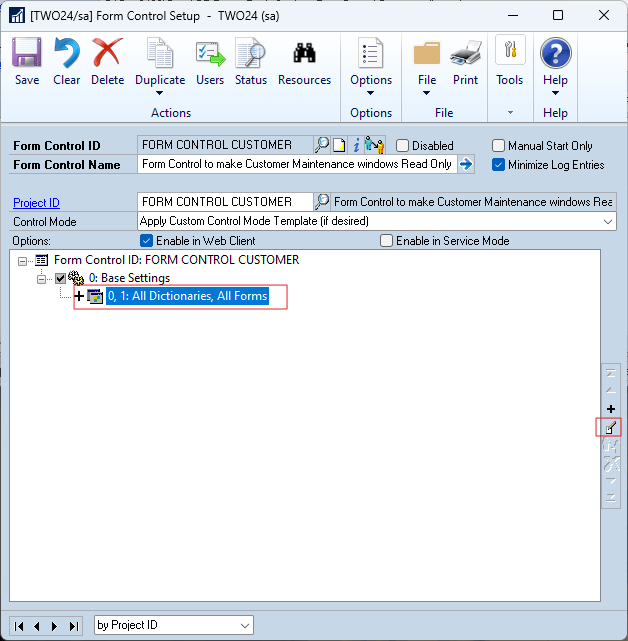
Now we will change the Base Settings Resource Filter to ensure that the Form Control ID is only applied to forms starting with the form technical name “RM_Customer”.
- For the Base Settings (0) Rule, select the default Resource Filter (0,1) and click the edit button, or double click on the Resource Filter.
- Change the Form Mode to Begins with and enter the Form Name as “RM_Customer” and click OK.

Now let’s add the Rules and Resource Filters to make the Maintenance and Address Maintenance windows Read Only using the built in Control Mode Templates.
- Use the Control Mode drop down list to select “Make Maintenance Windows Read Only” and respond “Yes” to the confirmation dialog. This will add a Lock Field Rule with the Resource Filters to include Forms ending with _Maintenance and exclude the fields used for navigation.
- Use the Control Mode drop down list to select “Make Address Maintenance Windows Read Only” and respond “Yes” to the confirmation dialog. This will add a Lock Field Rule with the Resource Filters to include Forms ending with _Address and exclude the fields used for navigation.

If you want to see the Rule Settings, you can double click on the rule or select the rule and click the Edit button. For the Control Mode Templates, the Key Field List will be populated with the key fields for the windows. For the Customer Maintenance windows we only need Customer Number, but the templates work for Customers, Vendors and Items and so include all three fields. A field listed that does not exist on the target window is ignored. The Key Field List is used to force a refresh of the Rule after that field changes. This ensures fields remain locked when a record is displayed (solving the issue with Field Level Security).
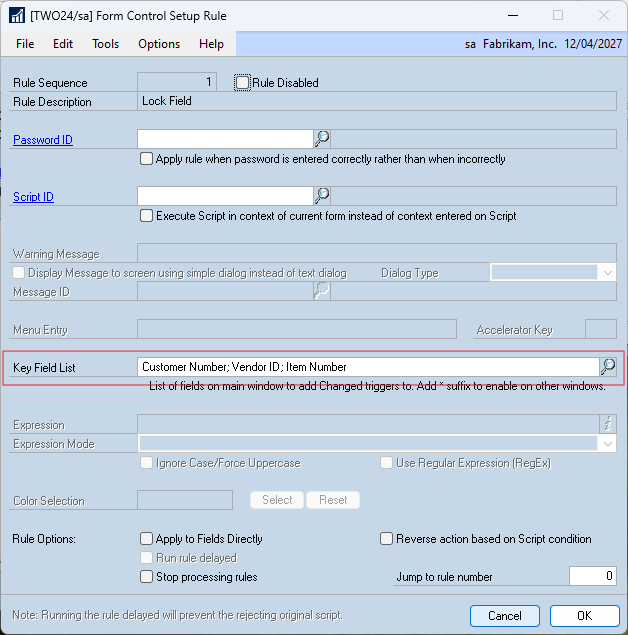
The final step will be to specify which users and companies the Form Control ID should be applied to.
- Click on the Users Button in the window’s toolbar to open the Form Control Enabled for Users window.
- Decide how you would like to apply the Form Control and change the settings accordingly. You can Include or Exclude by User and/or Company. Or you can include by User Class, Security Task, Security Role or Security Mod Alt ID. Use the View Button to change the View as needed.
- Click OK once done.
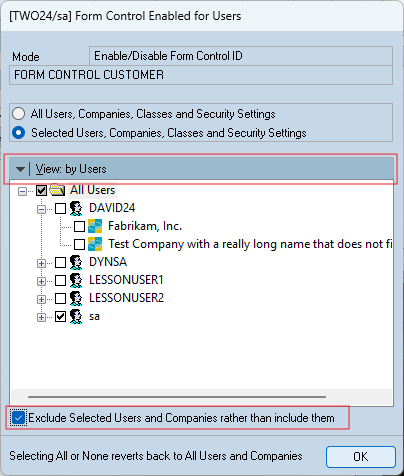
The example above applies the Form Control to all users except ‘sa’.
Back on the Form Control Setup window there will be a visual cue (red dot on User Button next to Form Control ID) to show that User Settings are active.
- Click Save or use Ctrl-S to Save and Continue (or select Save and Continue from the Options menu).

That’s all that is needed. Form Control is active as soon as it is saved.
Note: User Settings can be applied at the Project Setup level as well but need GP Power Tools Build 31.2 hotfix or later to work correctly.
Now when the Customer Maintenance window is opened, it will be Read Only for the specified users or companies.

Note: The steps above can be used with Vendor Maintenance and Vendor Address Maintenance as well. Just reference Vendor instead of Customer, PM_Vendor_Maintenance instead of RM_Customer_Maintenance and use PM_Vendor instead of RM_Customer. You can also duplicate the Customer Maintenance project and then edit the Resource Filters.
More Information
Here are the articles in this series, they will be available after the publishing date:
- 13-Sep-2024: #GPPT Form Control Introduction – Making Maintenance windows Read Only – Part 1
- 16-Sep-2024: #GPPT Form Control Introduction – Making Maintenance windows Read Only – Part 2
- 17-Sep-2024: #GPPT Form Control Introduction – Making Maintenance windows Read Only – Part 3
- 18-Sep-2024: #GPPT Form Control Introduction – Making Maintenance windows Read Only – Part 4
For more information see:
- GP Power Tools Portal: https://winthropdc.com/GPPT
- GP Power Tools Samples: https://winthropdc.com/GPPT/Samples
- GP Power Tools Videos: https://winthropdc.com/GPPT/Videos
Hope you find this example useful.
David
This article was originally posted on https://www.winthropdc.com/blog.
0 Comments on “#GPPT Form Control Introduction – Making Maintenance windows Read Only – Part 2”